
.jpg)
.jpg) These oversized coasters are easy to make! We actually have a SEW SIMPLY laminated pattern for this cute project in the shop but we want to treat you to a free tutorial today! These would make special little "Valentines" for friends, mothers, sisters, teachers, even grandchildren!
These oversized coasters are easy to make! We actually have a SEW SIMPLY laminated pattern for this cute project in the shop but we want to treat you to a free tutorial today! These would make special little "Valentines" for friends, mothers, sisters, teachers, even grandchildren!
Project can use leftover Pre-Cuts from other, bigger projects!

You can use leftover charms, jelly strips or cakes!
Fabric A: 5" Square (Charm)
Fabric B: 3 1/2" x 5" (from a charm)
Fabric C: 2 1/2 " x 8" (from a jelly)
Backing: 7 1/2" x 8 1/2" ( from a "cake")
Batting 7 1/2" x 8 1/2"
Here We Go!--All Seams 1/4"
Stitch A-5" Square to B-3 1/2" x 5". Press seam to side
Stitch A-5" Square to B-3 1/2" x 5". Press seam to side


"Square Up" to 5" x 8"--1st Unit

Stitch C Strip to 1st Unit. Press seam toward Strip.
 |
"Square Up" to 7" x 8"

Lay Down Batting, Then Backing--RIGHT SIDE UP
Lay Mat Top RIGHT SIDE DOWN
PIN Layers together **Backing is a little wider than top


Mark an opening along the side about 3" (for turning)
See Below

Mark 3" Opening
Be sure to backstitch at beginning and end of stitching layers together to hold secure when turning right side out.
Beginning at one "Opening Mark" --Stitch 1/4" around the edge of the TOP (NOT the edge of the Backing).
 | ||
Pivot at Corners and STOP at 2nd "Opening Mark"
Be sure to STOP and leave opening Free!
 |
Trim Seam edges--I like to make the edges a little uneven for a smoother finish when turned.
 |
Clip all Corners--BUT be careful not to cut stitching!
 | ||
*Happy Hint for you!
(I just figured this out about 2 years ago--it only took me about 45 years of sewing!)
BEFORE you turn your "sandwich" right side out--press around stitching to set seams--THEN Press down the free edges of the opening to make a crease even with the stitching--do this on FRONT and BACK.
BEFORE you turn your "sandwich" right side out--press around stitching to set seams--THEN Press down the free edges of the opening to make a crease even with the stitching--do this on FRONT and BACK.
 |
Pressing will make the edges stay inside and make stitching the opening easier--
 |
Turn Mat RIGHT Side OUT--Almost finished!
 |
Use a "Purple Thang" or Knitting Needle or Crochet Hook
or whatever you can get your hands on -that's not too sharp- to poke the corners out and I like to run the point along the seams on the inside so they don't "fold in" when you press.
or whatever you can get your hands on -that's not too sharp- to poke the corners out and I like to run the point along the seams on the inside so they don't "fold in" when you press.
 |
Press around edges
Slipstitch to close opening OR...
 |
...stitch around very close to the edge!
 |
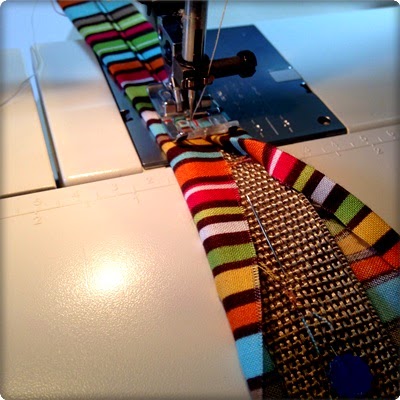
Topstitch 1/4" around all seams
OR PRACTICE Free Motion Quilting--woohoo!

We hope you'll enjoy making many merry MugMats!
If you'd like a printed pattern--a simple laminated Mug Mat pattern is available at the shop for just $3!
Happy Sewing!
Cindy


.jpg)

